This blog has moved

This blog has re-located to Chester

Saturday 31 December 2011

Farewell 2012 - a Year in Cycling

*The format of this piece is borrowed from David Mitchell's yearly piece in his Guardian/Observer column.

What an eventful year 2012 was in the wide world of cycling. The UK government was forced to adopt the EU fifth motoring pillar as a part of a series of concessions made during negotiating our re-entry into the EU after the events following David Cameron's now infamous use of the UK veto at the end of 2011. The change has yet to have any detectable effect on cycling rates, with a government spokesperson adding, "It seems that the legal technicalities surrounding insurance disputes following road traffic collisions was not the major factor which was keeping people off their bikes. We are at a loss." 2012 was also a year for moral outrage, following from the announcement that Brooks were planning a Soylent variant of their popular B17 saddle. The company to issue a statement apologising for the move, "We misread the market," claimed a Brooks spokesperson, adding "It seems it just isn't the time for this type product right now."

As we are soon to transition from one year into the next, let's take a moment to remember some of the more notable stories from 2012:

Churchill Ballad
Earlier this year Adobe released the Re-animation Suite, a collection of software tools which allowed the creation of an animatable CGI model of a person using a combination of archive still and video imagery. Following Adobe's acquisition of Bremneras, a company specialising in voice emulation software, the means to produce photo-realistic animated versions of people which could speak in the appropriate voice were within the grasp of ordinary people. Predictably, many set about using the technology to make crude YouTube videos. However, cycle journalist Carlton Reid seized upon the opportunity to re-animate the speech by Winston Churchill which is used in one of his I Pay Road Tax graphics:


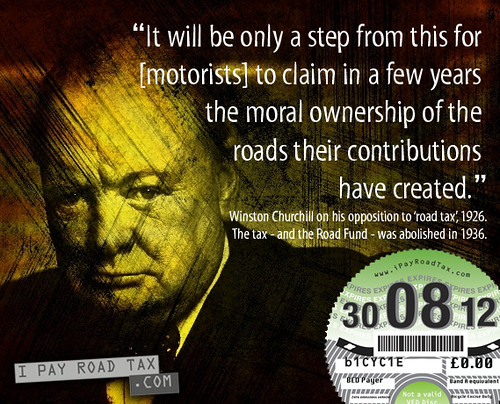
The resulting video was later re-mixed and auto-tuned into a faux-power ballad and promptly went viral. In the process, Mr Reid, creator of the original video, became a mainstream celebrity on the back of the popularity of the viral hit. Carlton's new-found fame led to him being invited as a guest on Top Gear, leading to one of the most memorably violent interviews in the show's run. He also managed to get the fastest time in the reasonably priced car.

Healing Power of Helmets
In August, ground-breaking work was published in the Lancet identifying the possible use of cycle helmets as a powerful universal placebo. Professor got the idea for the study after seeing how strong many non-cyclists faith in cycle helmets was, despite the lack of evidence in support of this position, "I often receive comments and heckles when out on my bike. One of the recurring comments was along the lies of, 'You should wear a helmet, otherwise you'll have an accident.' it was at this point that I realised that the cycle helmet held a special place in the imagination of a large section of the public, who attributed it with almost limitless healing and protective power" This prompted the Professor to put his lab to work in investigating this effect further. Whilst the helmets could not do much to help cyclists in the event of a crash, the group found that wearing a helmet during the recovery process significantly reduced treatment time compared to the control group. The team proposed that what they were witnessing was actually a super-powered variant of the placebo effect, noting that helmets could be used to reduce recovery times for illnesses and injuries which were completely unrelated to cycling.

Cycle helmets are now used as a universal placebo in hospitals nationwide, shortening the recovery times for all patients regardless of their condition. Whilst the work has been widely welcomed, it has been a disaster for Cyclehelmets.org, who now have to issue a warning to visitors of their site that the contents may prevent their future use of the universal placebo treatment. Those who choose to continue reading the site are urged to carry a card stating that in the event of injury, use of the new universal placebo will no longer be effective.

Cat-6 Olympic Shocker
Earlier in the year, there was a great deal of surprise when the IOC unexpectedly recognised Cat-6 racing as a separate Olympic sport. The inaugural race taking place at the London 2012 games. As I'm sure most of you are aware, professional Cat-6 racing takes place on open streets and the winner does not merely cross the finish line first, but must be acceptably presentable for a working typical office environment. The sport attracted athletes from other cycling disciplines who were keen to be the first to win gold in the new event, in addition to enthusiastic amateurs including Mr Jim Davis from The Cycling Embassy of Great Britain. Whilst Mr Davis (who rode his Dutch bike during the event) crossed the finish line last, he was already dressed in a suit and didn't need to take a shower. To the shock of much of the world of professional cycling, he took home the gold medal. 

In the months since the games, the recognition of Cat-6 racing as an Olympic sport and the result from the first race has had a profound result on the nation's Fred population. Many manufacturers were quick to respond, with Specialized producing an all-crabon roadster including crabon mudguards and chaincase and Endura produced a Cat-6 cycling suit which is designed to be indistinguishable from a regular £150 suit in every single characteristic (MSRP £350). Sturmey Archer announced that crabon-shell version of their popular AW hub will go on sale in early 2013, complete with all-titanium internals.


Trek was not so quick to respond, with their new Cat-6 Madone rumoured to just be a Batavus with 'Madone' written on in Tippex.

Monday 19 December 2011

Cycling is Safe

This one has been languishing in my drafts for quite some time, with both Vole O'Speed and As Easy As Riding A Bike sharing their own views on the issue in the meantime. Statistically speaking, cycling here in the UK appears to be surprisingly safe. Indeed, in the past I have focussed on this when talking to new and potential cyclists about their experiences of poor subjective safety. These statistics are also readily utilised by a vocal minority who  are ideologically opposed to the use of separation by mode for the prioritisation and protection of cyclists. As is often the case with statistics they only tell part of the story; whilst it appears at first that they show cycling to be a 'low-risk activity,' what they literally show is that the current sub-section of the population who choose to cycle are doing so relatively safely.

Like most other people who choose to cycle in the UK, when I cycle I do so in a hyper-aware state; I always expect the worst from other road users, I pre-emptively hover over the brakes when I see a car approaching a give-way line where I have clear priority and I plan my escape route for when that BMW makes a sudden turn without indicating. I am relatively fit, fast, I cycle in the optimal gear and I know precisely how much force I can put into the brakes before the wheel locks up. Put simply, the bar it set much higher for cyclists than it is for other road users because the road environment is inherently hostile for cycling. Most people who drive motorised vehicles, which are significantly wider, faster and heavier than bicycles, do not do so in a similar state of hyper-awareness. This is because there is simply no need; the vehicles and road environment have been designed in such a way that their operators are largely protected from the limitations of their own ability. The bar has been set rather too low for such inherently dangerous machines.

I have often thought that if some of the greatest minds of the 1950s were put together in a room and given  and nearly unlimited budget and the specific task of designing a road network to minimise the number of people choosing to cycle, without being permitted to explicitly make cycling illegal, the result would not be far off the current UK road network. The exceptional hostility for cycling which is designed into the UK road network is enough to prevent the vast majority of people from every wanting to cycle on it. The result is that those few who are willing to cycle on it are not at all representative of the general population; it is because this minority can cope with the road network as it currently exists that cycling appears to be a statistically safe activity.

In The Netherlands, cycling is statistically slightly safer than the UK. The difference is not as much as might be expected, which is often used as an excuse for opposing the construction of Netherlands-style dedicated cycle infrastructure in the UK. However, with a little context the safety statistics from The Netherlands start to appear much more impressive. By implementing road designs which are not inherently hostile to cycling, the section of the population choosing to cycle is much more representative of society as a whole. The majority of ordinary people, cycling without being in a hyper-aware state typical of UK cyclists manage to get around by bike and are still statistically more safe than the tiny minority of physically and mentally exceptional UK citizens who choose the bicycle. Next time there is a discussion about how safe cycling is, remember that in places such as the UK where cyclists are a tiny minority, the statistics don't tell you a great deal about how safe cycling is, only how safe cyclists are.

Tuesday 13 December 2011

The Twelve Days of Christmas

Apologies for my recent absence, unfortunately the blog had to go on the back-burner for a few weeks. It is now less than two weeks to Christmas, which means I can share with you The Twelve Days of Christmas (for cyclists) starting on the last verse. Feel free to sing along.

On the Twelfth day of Christmas my council gave to me

Twelve Cyclists Dismounts


Eleven-inch wide bike lanes


Ten side-road give-ways


Nine wheel-benders


Eight near misses

Courtesy of MiddleAgeCyclist

Seven narrow 'A' frames


Six-Pounds from the budget


Five buckled rims

Image courtesy of Bakfiets en Meer

Four biking 'crackdowns'

Image courtesy of Bike Snob NYC

Free high-vis

Image courtesy of The Lo Fidelity Bicycle Club

Two ASLs


And a bike lane running through a tree

Image courtesy of Facility of the Month

Saturday 3 December 2011

Re-gearing the Brompton

Second-hand bikes can be a great way to get a good bike at a more affordable price. The downside is that you  get a bike which has been set-up according to the preferences of its previous owner. When I purchased the Brompton back in February, it had been set-up with obscenely high gearing, a 50-tooth chain-ring with a 13-tooth rear sprocket. With the Sturmey Archer S-RF3 rear hub, this gave gears with 3.7, 4.9 & 6.6 metres development respectively. I put up with this for a long time because although it was much too high, it still worked. Eventually, the stresses to the sprocket and chain from starting from stationary in such a high gear were too much, and the chain would no-longer mesh with the chain-ring.

Not having a 24mm socket to remove the left-hand folding pedal, I had a look at the official Brompton chainsets which would allow me to leave my existing left crank in place without a major mismatch. Needless to say, they were excessively expensive. Instead, I was fortunate enough to find a Stronglight chainset which, online at least, looked similar enough to the Brompton one for me to get away with leaving the original left crank in place.


The unused Stronglight left crank, with the original Brompton one. They could almost have been separated at birth.


The fitted Stronglight chainset with the Brompton original below, again they are very similar looking indeed. I also replaced the rear sprocket and chain, resulting in 42 teeth at the front and 14 teeth at the back. This produces 2.9, 3.8 & 5.1 metres development, respectively. This means the Brompton can now much more easily climb hills and accelerate from stationary without busting my knees. It may not be a very flashy upgrade but it makes a significant difference to how useful the bike is. If your gears are too high (or low) don't suffer in silence, do something about it. It can make the difference between a bike you merely tolerate riding in certain circumstances to one you actively want to use.

Friday 2 December 2011

Thoughts on Cycling & the Political Spectrum

Cycling is not an inherently political thing. However, like many other things it is often framed in terms of the left-right political spectrum. In those who are more right-leaning, there is a tendency to frame things in terms of individualism and to look inwards to find the source of social problems, often suggesting they are a result of  a character flaw or behaviour. In those who are more left-leaning, there is a tendency to frame things in terms of collectivity and centralisation and to look outwards to find the source of social problems, often seeing behaviours as a result of environmental factors or a shortcoming of a society itself. As with most things, reality probably lies somewhere between the two extremes.

But what does all this mean for cycling? From a right-leaning perspective the bicycle fits nicely with individualism, an individual mode of transport which has no negative impact on the lives of others and offers the user complete freedom of movement. In a small way it allows its users to directly act against concerns such as climate change without the need to restrict the freedom of others. The economic benefits of cycling are also particularly desirable from a right-leaning perspective. From a left-leaning perspective the bicycle fits well with collectivism by producing wide-ranging societal and environmental benefits, especially in a country like the UK where the cost of healthcare is paid for through the government. Cycling (and affordable public transport) in place of catering primarily for more expensive environmentally and socially destructive forms of transport make mobility accessible to all members of society whilst increasing the health and safety of citizens, which is extremely desirable from a left-leaning perspective.

There are downsides too. There is a tendency towards xenophobia towards the right-end of the political spectrum; where cyclists are seen as a minority group they may be assaulted, threatened & intimidated by those who see cyclists as a group being 'different' somehow from themselves. The focus on social problems being a result of character flaws means that measures to promote cycling may end up being restricted to 'awareness' and 'training,' with infrastructural changes to the built environment to benefit cyclists (and other vulnerable road users) being shunned in favour of encouraging behavioural change indirectly, which is less successful. At the left-end of the spectrum there is a tendency towards over-regulation of the behaviour of the population, with measures such as compulsory cycle helmet legislation considered despite the damage these laws are already known to do to cycling rates.

As stated at the start, cycling is not inherently a political thing. The perception of the activity and those participating is largely due to existing personal experiences or prejudices, although how these experiences or prejudices manifest themselves may be framed depending on the political persuasion of the individual. However, when talking cycling with those in power, it is worth considering how to frame cycling as a 'good thing' in terms of the political mindset of the person whom you are addressing. For example, some might consider cycle infrastructure to be an inherently left-wing means of encouraging cycling, but it could just as easily be considered in more individualistic terms as a means of extending the freedom of movement for the individual, or as a means to produce an economic benefit. It's all a matter of spin.

Wednesday 30 November 2011

Luxury Luggage 2

Back in February when I purchased the Brompton, I also invested in a luggage block and a Brompton C-bag. Whilst the price of the C-bag was enough to make me wince, it is a high-quality product and has served me well since then. However, circumstances change and I now find myself in need of more carrying capacity when using the Brompton, so I took the plunge and purchased a T-bag. 


The T-bag was formerly known as the Touring Pannier and its recent name change brings it in-line with the rest of Brompton's luggage range and also shows that they still don't take themselves too seriously. It uses the same carrier frame as the C-bag but boasts a considerably increased capacity. The downside of this is that it is a bit more unwieldy and less pleasant to carry around when off the bike. The strap lacks the padded sleeve of the C-bag making it less suited to extended stretches of being carried over-the-shoulder.


The T-bag (completely unrolled) next to the C-bag. The difference in capacity is quite startling. The inside of the T-bag is lined with yellow fabric, as is the C-bag, in order to facilitate finding stuff rattling around the bottom. It's the kind of small touch which can help rationalise purchasing luxury luggage such as this.


The zipped pocket contains a fluorescent yellow rain cover much like the one which comes with the C-bag (book not included).


Unlike the C-bag, the carry strap can be removed if preferred, which can be useful to prevent it flapping around when riding. The top of the bag has two strips of velcro to pair the edges of the bag together before the top is rolled down. As a nice extra touch, the bag includes two identical strips of velcro which can be used as 'blanking strips' if you do not wish to use the velcro fastening.


The rider-facing part of the bag contains two pockets, the left one is identical to the pockets on the C-bag, the right is a draw-string affair which permits over-stuffing and would be particularly useful as a bottle holder. After looking it over, I decided to put the bag's capacity to the test:


Much like the C-bag, the T-bag has a reflective rectangle on the front in order to prevent flash photography and possibly also to aid being seen.

This is the T-bag in its over-stuffed state (although I should add that there is still some room in the front mesh pocket). In this state the bag slightly interferes with the steering, but not enough to cause a problem when riding, only when manoeuvring the bike through doorways etc. In this state, the bag is sufficiently large to accommodate the entirety of Star Trek.


After removing the four Enterprise box sets, the bag can be properly rolled-closed and clipped into the sides where the yellow and blue boxes are.


The contents of the bag emptied out for scale: Three The Original Series box sets, the The Animated Series, seven The Next Generation box sets, seven Deep Space Nine box sets, seven Voyager box sets, four Enterprise box sets, the first 10 films box set, a separate copy of The Voyage Home and the most recent film on Blu-ray. 

Whichever way you look at it, the Brompton T-bag has an impressive capacity. It would be ideal for carrying a significant amount of grocery shopping, lending further credibility to my assertion that if I could only have a single bike for all purposes, it would be a Brompton.

Monday 21 November 2011

B&M Lumotec IQ Cyo senso plus T


The Cyo T is much like the 60 lux Cyo, but with a row of four LEDs under the main lens which direct light at oncoming traffic for enhanced visibility

I have replaced my ailing B&M Lyt plus with the catchily-named Lumotec IQ Cyo senseo plus T also made by B&M. There are currently around ten+ variants of the Cyo, including 40 and 60 lux versions (the 40 lux incorporates a reflector which the 60 does not) bottle or hub dynamo versions, near-field lighting versions, automatic on/off via light sensor versions, versions with daylight running lights and either a black or silver finish for some of these models (as discussed previously). 

The Lumotec IQ Cyo senseo plus T is the hub dynamo version of the 60 lux Cyo, with automatic on/off via light sensor and daylight running lights. In this version, the light sensor switches the light between day and night modes. The daylight running lights consist of four LEDs underneath the lens for the main beam. Unlike the main beam which is directed at the road, these LEDs are directed at oncoming traffic as an aid to 'being seen.' During the day the main light beam is at significantly reduced intensity, whilst the four LEDs underneath the lens are all illuminated. At night, the main beam is illuminated to full intensity and only two of the daylight running light LEDs are illuminated, with these two LEDs also forming the stand-light feature in this model.

Whilst I am very happy with the Philips Saferide lamp recently acquired for the DL-1, the unique proportions of the Brompton mean that only a handful of front lights can be fitted without causing problems with the front luggage system. The Saferide is not one of these due to the lack of mount compatibility with B&M fixings (unless modified). Brompton specify either the bottom-of-the-line Lumotec halogen light with the Shimano dynamo wheel or the top-of-the-range (ish) 40 lux Cyo with the SON dynamo wheel. This is perhaps a little unfair to customers, as it suggests that the Shimano dynamo wheel can only power a low end light, despite it being capable of powering the same range of lights as the  SON*. As I discovered, as an alternative option the Lyt can be fitted to a Brompton by using a Cyo mount, although my initial research suggested that this was not common.

In complete darkness the Cyo T provides almost as much illumination as the Saferide. The beam is a bit less wide and the throw seems a little less too. The apparent subjective reduction in throw compared to the Saferide is likely a result of the central bright spot which comprises part of the beam shape. Whilst useful for avoiding potholes (especially so on a small-wheeled bike), the bright spot does make the rest of the beam which is projected beyond it seem less intense than it actually is. The slightly reduced beam width and throw compared to the Saferide is likely being exaggerated in this case by the lower mounting height of the Cyo on the Brompton (~350 mm) than on a conventional bike (~750 mm), but the beam is still entirely sufficient.

Where the Cyo T excels is in its urban-friendly features, such as daylight running mode which to helps mitigate the risk of not being seen by negligent motorists, and the automatic switching between day & night modes via light sensor. The daylight running lights are particularly effective at drawing extra attention in daylight, directing a good amount of light at oncoming traffic. At night, the two lower LEDs which remain turned on are illuminated to a lower intensity, to avoid blinding oncoming traffic. The automatic light sensor can be over-ridden if desired to keep the Cyo T in daylight mode at night. The level of road illumination provided by the light in 'day mode' is sufficient in well-lit areas where being seen may be of more concern than lighting up the road itself, still meeting the minimum standard for a 'proper' light.

The stand-light is different to other lamps I have used. Like the Lumotec Retro, the stand-light is provided by auxiliary LEDs rather than using the main beam as the Saferide and Lyt do. However, unlike any of these other lights the stand-light does not merely stay illuminated until the capacitor has been discharged, it is timed to shut off after around four minutes despite the capacitor having a capacity for a greater length of time. The result of this is that the stand-light is immediately available if the bike (dynamo) is moved again.


The rotary switch on the rear of the Cyo has three settings, off, sensor and daylight mode

Unlike the 40 lux version of the Cyo and the Lyt, the Cyo T does not come with an integrated reflector. A reflector is available for adding to the bottom of the standard Cyo mount, although the Brompton mount is not compatible with this. It is also worth noting that the Torx bolt which comes with the standard Cyo mounting bracket is not compatible with the Brompton Cyo mount due to the different tube thickness. Whilst this set-up has left the Brompton without a front reflector, the daylight running lights are definitely a replacement which is in the spirit of the law even if it does not conform to the letter of it.


The Torx bolt has instead been pressed into service mounting the Lyt back on the Yuba Mundo

I like the Cyo T. In plain terms of brightness and throw, it is not as good as the Saferide, but as I stated in that review, for urban utility riding the beam of the Saferide is overkill. The Cyo T also provides more than enough light for riding along unlit roads. However, the daylight running mode and the automatic switching between day and night modes make this an ideal choice for the primarily urban cyclist, whilst the beam it provides is more than sufficient for riding on unlit roads and paths too. Unless you do a great deal of your riding on completely unlit roads, these extra features probably make the Cyo T the better choice.

*The Brompton SON dynamo wheel could be used to drive a pair of front lights as is fairly common practice amongst SON owners. For typical Brompton usage it is probably not worth the extra cash.

Friday 18 November 2011

Raleigh Twenty Stowaway

The Sturmey Archer AW hub which was used for the pictures taken to make the hub servicing guide which formed my last post was from this Raleigh Twenty Stowaway; the folding version of the classic Raleigh Twenty. This Twenty belonged to a friend of mine and I was servicing the hub before selling it on her behalf. Prior to servicing the hub, I had done just about every conceivable bit of maintenance on this bike including front wheel, headset and bottom bracket bearings, a complete disassembling, cleaning, greasing and reassembling and replacement of the tyres, tubes, chain and saddle. As a result of this, the bike rides just like a brand new bike, despite being from 1976.


Raleigh used the 'Stowaway' branding on some of their folding Twentys (in addition to several unrelated models).


The main hinge in the frame is perhaps inelegant but very sturdy.


Difficult to see on the picture, but the rear reflector is branded as Sturmey Archer.


Pletscher rear rack, complete with a rat-trap for carrying a newspaper.


Sturmey Archer AW hub, as featured previously.


The original Sturmey Archer grip shifter, controlled by rotating the entire grip to switch gears. In practice it works better than I expected.


Raleigh Twenty 'R-20' branding.


Seat-tube decal.


'The Raleigh' Nottingham headbadge.


Brand new Raleigh Record tyres, as originally specified with the bike.

The Raleigh Twenty design has undoubtedly passed the test of time. It is a shame that the equivalent models subsequently made by Raleigh have failed to match the comfort, handling and practicality of this model. Clones of the Twenty do exist, although they have their drawbacks including price and the use of V-brakes on the UK model. There is nothing to stop Raleigh bringing back the Twenty properly, a good, small utility bike could be a good addition to their range. A few concessions to modern manufacturing techniques and componentry could be made, such as a welded frame (rather than brazed) a unicrown fork (rather than lugged). These minor sacrifices could easily be offset by a few improvements, such as dual pivot caliper brakes (or drum/coaster brakes), 406 mm aluminium rims (allowing a greater choice of tyres and the ability to stop during rain) and a proper headset (rather than a nylon bushing at the top of the head-tube).

After courting the 'sporting goods' and 'bicycle shaped object' markets extensively for the past few decades, perhaps it's time for Raleigh to look back on one of the models which once made them great, and bring it back.

Wednesday 16 November 2011

Servicing a Sturmey Archer AW hub

The Sturmey Archer AW hub is 75 years old this year. The reliability of this design means that there are plenty of these hubs still in service. The ease of serviceability of this design means that returning one of these hubs to its former glory isn't all that difficult. Many minor issues such as resistance to freewheeling, hub seizure, general resistance to rolling and problems accessing certain gears can be fixed by taking the hub apart, cleaning the internals and re-assembling it all with some fresh grease.

Whilst I have written about working on an AW hub previously, the nature of the work means that it is difficult to take pictures whilst cleaning and re-assembling the hub. Thankfully, this time I was able to get a little help with taking pictures. To open up an AW hub (and most other Sturmey Archer hub gears) remove the left-hand (non-drive side) locknut and cone and uncrew the right-hand ball ring using a hammer and a flat screwdriver on the semi-circular cut outs of the ball ring (these are not rounded on the older versions of the AW). This should let you get the internals out, axle and all. This can be further disassembled by removing the right-hand locknut and cone, which allows the rest of the hub mechanism to be taken apart.


One of the notches for unscrewing the right-hand ball ring


Left to right: The left-hand axle nut, non-turn washer, locknut, spacer and cone


Left to right (top): right axle nuts (later integrated into a single piece), non-turn washer, locknut, cone lockwasher & cone. Middle: cone. Bottom: indicator rod (with indicator rod locknut seen above the locknut)


Left to right (top): Dust cap, sprocket snap-ring. Bottom: spacers. Assembled as: Dust cap, spacer, sprocket, spacer, snap-ring.


The driver assembly and clutch spring


Gear ring (left) and right-hand ball ring (right)


Left to right: clutch sleeve, clutch, axle key and thrust ring


Top: Axle (including sun pinion). Bottom (left-to right): Planet-cage, 4 planet pinions (cogs) and 4 pinion pins.

The low-gear pawls in the planet-cage can also be removed if necessary, although when removing these be sure not to lose the tiny pawl springs in the process. The same also goes for the pawls in the gear ring.

Once all this has been disassembled, a good cleaning with some degreaser and a cloth or paper towel should restore the hub to its former glory. Particularly dirty or rusty parts can be soaked overnight or cleaned with wire wool (just make sure to remove any left-over bits of wire wool before re-assembling the hub).


To re-assemble the gear mechanism, hold the axle vertically with the drive-side pointing up (axle hole above the sun pinion).


Add the planet pinions and the pinion pins back into the planet cage and place the assembly over the top of the axle with the planets at the top.


Add a dab of Sturmey Archer hub gear grease to the planet pinions and rotate the planet cage assembly around the axle a few times to distribute the grease around.


Place the clutch sleeve over the axle and line up the hole in the sleeve with the hole in the axle.


Place the clutch over the axle and the clutch sleeve.


Slide the axle key through the hole in the clutch sleeve and axle, with the threaded hole in the axle key lined up with the centre of the axle.


Slide the thrust ring over the axle key and clutch, lining up the grooves in the thrust ring with the protruding parts of the axle key.


Place the gear ring over the planet cage assembly and clutch assembly, being sure to line up the grooves inside the gear ring with the planet pinions.


Place the right-hand ball ring over the gear ring.


Add some lithium grease to the ball bearings within the ball ring (ideally more neatly than this).


Place the clutch spring over the axle, ensuring the plastic (or metal) ringed-end of the spring pointing upwards.


Place the driver over the axle. The clutch spring will push against the driver until the right-hand cone is added to hold the driver in place.


Add lithium grease the the ball bearings in the driver assembly and screw the right-hand cone onto the axle as with any other cup-and-cone bearing system.


Add the cone lockwasher and locknut.


Add lithium grease to the left-hand bearings.


Add the left-hand cone, spacer and locknut.


On the right-hand side, add the dust-cap, a spacer, sprocket, another spacer and snap ring to the end of the driver assembly.

The wheel may be bolted back into the frame, the indicator rod screwed back into the axle key and to the gear cable and the hub is ready to be tested. With any luck, the hub should perform just fine for another couple of decades. The 'no intermediate gear' (NIG) versions of the hub, such as the current AW hub, the S-RF3 and the gear mechanism in the X-RD3 are fairly similar to this, with minor changes to the clutch assembly and the driver, which has its own pawls in this version. There have also been numerous small revisions throughout the run of the original AW hub, although they should pose little trouble when using this guide as reference. The best advice I can give anyone who wishes to service one of these hubs is to just go for it; when disassembled the hub really isn't as daunting as it may appear from reading this guide (or similar guides).