This blog has moved

This blog has re-located to Chester

Wednesday, 28 July 2010

Things That Can be Carried On A Bike

This is in honour of the blog Urban Simplicity which was one of the blogs which inspired me to take the plunge and buy the Yuba.  It also is here to show that you can still get a whole load of stuff at the supermarket without needing a car.

IMAG0294

Here is my trolley-full.

IMAG0295

Here it is loaded onto the Yuba.

SCAN0247

And here is the list in full, feel free to criticise my choices of goods in the comments below.  The item marked as chocolate on the bottom is actually Chocolate Weetabix.  I have high hopes for them, check my Twitter for updates.

Tuesday, 27 July 2010

Changing a freewheel

The Yuba’s freewheel has been making a knocking sound for a while now.  It has been intermittent, which is why I have put up with it for so long.  I have had the replacement freewheel and chain for a while but the knocking stops often enough for me to put it off.  Whilst I have changed a few freewheels in my time, I thought I would write about it to help others who have not.

It may seem odd that a bike which costs as much as the Yuba would come with a freewheel instead of a freehub and cassette.  Yuba state that it is their intention to make the Yuba as easily serviceable as possible, wherever in the world the bike may be.  Freewheels are available almost everywhere, cassettes may not be.  Freewheels are more wasteful because you throw away the internal ratchet mechanism with the cogs, whereas with a cassette the ratchet mechanism is built onto the hub.  This does make replacing a faulty ratchet mechanism easier, although it is usually the cog teeth which wear out when a freewheel or cassette need replacing.  The freewheel is also the reason why the Yuba comes with a 14 mm rear axle rather than 10 mm, the ball bearings which connect the axle to the rest of the wheel are further away from the part of the axle on which the frame sits on a freewheel system, making it easier for the axle to become bent

747px-Labeled_Bicycle_Hub_Comparison-en.svg[1]

This is why Yuba rear wheels come with 14 mm axles, and this is why replacing the rear wheel with a cassette hub with a 10 mm axle doesn’t reduce the load capacity of the bike, as long as the wheel is still 48 spoke.

To remove a freewheel you will need a freewheel removal tool (slightly different shape to a cassette/centrelock tool), an adjustable spanner (wrench) and usually a lot of shouting and swearing. 

CIMG2177

CIMG2176

To unscrew the freewheel you need to turn the removal tool anticlockwise.  This is often difficult because the freewheel is screwed on tight by the process of riding the bike.  This can be demonstrated by the fate of the first adjustable spanner I used:

CIMG2189

CIMG2184

After a quick trip to Clas Ohlson  and I returned with an even longer adjustable spanner, made from stronger metal

CIMG2183

Once removed, you can see the treads on which the freewheel sits:

CIMG2179

It is worth making sure theses are greased before putting on the new freewheel, because you’ll have to take it off one day.  I would have serviced the bearings whilst I was at it if I had the 19 mm cone wrenches the Yuba rear wheel needs.

Screwing on the new freewheel is a simple as it sounds.  You will need a new chain too though.  When chains are used, the holes in which the pins sit stretch slightly, increasing the lengths of the links.  This wears the teeth on the freewheel or cassette so you don’t notice.  If you use an old chain with a new freewheel or cassette you will wear the teeth much faster, plus the bike will feel like the chain is full of gravel until the teeth wear to fit the old chain.  Luckily chains are cheap, unless you are planning to buy something ridiculous like this.  The Yuba needs about 1 and a half chains to make up the required length.

I also decided to change the tyres and add a permanent rear light (from Clas Ohlson) whilst I was working on the Yuba, it seemed to make sense to keep the Kona’s brown Fat Franks and sell it on with the older black ones.

IMAG0283

IMAG0286

Now all I need is a B67 saddle in honey to match the tyres.

Gazelle

Royal Dutch Gazelle is the largest bicycle manufacturer in The Netherlands.  Their bikes are generally well regarded as sturdy, well made transportation bikes, the kind of bikes which are common in the Netherlands but not so much here in the UK.  They got the “Royal” part of their name from Princess Margriet in honour of their centenary in 1992.  In addition to being a constitutional monarchy, with similar dense old cities and having a very similar climate, The Netherlands also has a very similar population density to the UK.  Sadly (for us) they have managed to deal with the issues of transport in a much better way than we have. I have seen a few Gazelles around on my travels:

IMAG0174

This is one of the most impressive kids’ bikes I have seen in Manchester.  Slack geometry, dynamo lights, mudguards, chain-guard, frame-fitting lock and a rear rack.  On a kids bike.  The wheels are 22 inch, which is probably a major pain to get replacement parts for, but like the Twenty next to it, it is probably fine to ride will into adult life with a longer seatpost.

IMAG0274

Woods valves, I’m not the only one. 

IMAG0275

A view from the front.

IMAG0277

Close up of the rear-rack, a nice sight on a bike aimed at the Children's market.

IMAG0278

There is even a bit of nice detail on the lugs, and a hole for the dynamo wiring .

IMAG0271

This is another Gazelle parked up near work.  Sturmey drum brakes in addition to mudguards, chain-case, dynamo lights, rear rack, frame fitting lock  and a skirt-guard.  All practical accessories for a transport bike, sadly rarely seen.

IMAG0272

It even has Gazelle wheel nuts and a bit of detail on the fork crown.

IMAG0281

Another practical Gazelle bike, this one is similar to my Raleigh Tourist, with slightly steeper geometry but similar components.  The rear rack has a fold-down stand much like a Pashley Roadster

IMAG0282

The rear wheel is a 3 Speed Sturmey Archer affair, with a coaster brake.  Coaster brakes are quite rare in the UK but I found the Kona’s coaster brake very intuitive.

These bikes aren’t for everyone, but it are ideal for the everyday needs of a great number of people.  Considering how much attention my DL-1 gets when it is out, it seems that the bike industry is missing an opportunity here in the UK.

Sunday, 25 July 2010

8 Freight

I have spotted this bike and its rider around Manchester several times over the last few years, usually around the city centre.  I have never been able to get a proper look at it, until now.  It is called an 8 Freight, and it reminds me of a Madsen bucket bike, or a Bakfiets with the box at the back.  Apart from a one-off sighting of a Surly Big Dummy it is the only other cargo bike I have seen in use in the city.

IMAG0259

I can understand the choice to use 20-inch wheels, due to their increased strength.  This is also done on the Madsen bikes.

IMAG0260

This design choice is a little more puzzling, a single blade fork seems an odd choice for a load-carrying bike.  The bike is designed by Mike Burrows, a look at his other bikes might explain why he went for the single blade aesthetically, in addition to the rather steep head and seat-tube angles for a cargo bike. 

IMAG0261

Drum brake on the front.  According the the spec this is a Sachs, which is now SRAM.  Oddly, SRAM state that their drum brakes are unsuitable for 20-inch wheels.  They should give a lot of stopping power on such a small wheel.

IMAG0262

IMAG0265

Interesting method to get the chain underneath the box.  Also note the wide kick-stand.

IMAG0266

Again the wheel is attached to the frame at one side only.  Another Sachs drum brake and a 6-speed freewheel/cassette.  the spec shows an 8-speed cassette and the name suggests it was originally an 8-speed.  Considering the length of the gear cable, and the tolerances involved in getting reliable shifting it makes sense to convert it to a 6 speed.

Hopefully the cargo bike will continue to grow in popularity and will become a more common sight on our streets.

Friday, 23 July 2010

Sky Ride Sunday 1st August

I went to Sky Ride in Manchester last year.  You may think it is an overly sanitised corporate affair, and it is.  It was also actually quite fun to see much of the city centre closed to motor traffic (as it probably should be anyway) and see plenty of people on bikes who probably haven’t been on a bike in years.  If you can cope with some occasionally gruellingly slow riding and are prepared for the extreme inexperience of some of the other riders, I’d advise giving it a go.  If you are an inexperienced rider you may get even more out of the experience.

357_w695_s[1]

This is the route plan for the 2010 Sky Ride.  It differs from last year’s route, which is nice.  It is unfortunate that Sky have chosen to make helmets mandatory for minors for this event, it seems counter-productive to force children to wear helmets whilst telling them how safe and great cycling is.  At least the rest of us are free to choose.

Alternatively there is Critical Mass two days before.

Thursday, 22 July 2010

Living with a Broken System

The road network in the UK is a broken system which has slowly been almost totally misappropriated by motorists to serve their interests.  Whilst I am comfortable riding on the roads, I can see why they are unattractive to new and potential cyclists.  This is why despite my own comfort with road-cycling I would support the wide scale construction of segregated cycle facilities on the Dutch model.  I believe this will be more effective in getting people out of their cars than other initiatives.  Subjective safety is important in encouraging cycling, but is overlooked often.  After all, most humans aren’t rational creatures, how else would we end up with a society where it is seen as normal to drive a mile to get two bags of food from a supermarket.

On the other side, I understand why existing cyclists can be opposed to such facilities.  The existing cycle infrastructure in the UK is largely worthless, the logical fear being that extension of cycling infrastructure would be along the lines of what we already have, and that a large investment in this kind of infrastructure would lead to cyclists being legally compelled to use it.  I would prefer not to have any cycling infrastructure than the dangerous and idiotically designed facilities we currently have being expanded on a large scale.  It is also worth noting that if we moved away from having one car for almost every adult, the reduction in traffic would make the roads safer and more inviting for other types of traffic.

However, none of these things is happening right now and so all that remains for us to do is to try and make do with the broken system we already have.  The best way I have found to do this is with vehicular cycling.

If you are new to cycling, think about where you position yourself on the road.  Do you ride as close to the kerb as is practicable?  Do you find yourself wary of entering the traffic flow?  Do you worry a lot about being hit from behind whilst cycling along the road?  Do you find that you are often overtaken with very little clearance?  I think most new cyclists would answer yes to most of these questions, and the more experienced of you may remember a time when those concerns weighed heavily on your mind.  I know I do.  There are a few simple tips and techniques which can make riding on the road feel a lot safer (and be a lot safer).

1) You are traffic.  Traffic does not equal cars, you have as much right to use the road as anyone.  You pay for the roads just as much as anyone else.  You are entitled to use the whole of the lane if you feel it is necessary.

2) Don’t ride in the gutter.  If you do, motorists will treat you like you belong in the gutter.  Most gutter-cycling is a response to the fear of being hit from behind.  In practice this is extremely rare.  When cycling in the gutter motorists will try to squeeze through a gap about as wide as you plus the car plus 5 cm.  These small but apparently passable gaps come up fairly frequently, and being hit whilst being unsafely overtaken is a fairly common form of motorist negligence.  Try to ride at least a metre out from the kerb.  You can start small and slowly increase the distance when your confidence grows.  This will stop unsafe overtaking because there will be fewer opportunities for motorists to overtake when it is not safe to do so.  There is an interesting psychological effect which comes with this technique; motorists are much more likely to overtake using the proper technique prescribed by rule 163 of the highway code:

rule163[1]

To further decrease your risk of being unsafely overtaken,  be sure to not wear a helmet.

gutter 2

This is a common occurrence when gutter-riding, the near-death overtake.
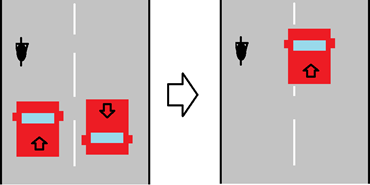
gutter 1

By taking control of your part of the lane, you can prevent this kind of behaviour.

It is also useful to stay at least a meter or so out from parked cars, due to the risk of “dooring.”  It is a sad state of affairs that a great deal of the existing cycle lanes in the UK are placed in the door-zone of parking bays.

3) Look behind you, a lot.  It is important that if you are going to be a part of the traffic, you need to know when is coming from behind.  I tend to check behind whenever I can hear a car approach, except in slow moving “rush” hour traffic where it is not feasible and the cars are not moving fast anyway.  Even when you can’t hear anything it is worth checking behind once a minute or less.  The benefits of doing this are threefold; You know what is coming from behind you, making you more confident to ride further from the left, secondly the person in the car sees you look at them, you cease to be a bicycle in their mind and become a person and thirdly motorists are told during their “training” that they should look out for cyclists who are looking behind them as they may be wishing to pull out shortly.  This helps in making sure you are overtaken safely.

4) Traffic islands and other narrowing road sections.  When the road ahead of you does not allow adequate space for anyone to overtake you, ride in the centre of the lane to stop them trying.  Don’t feel bad about adding 10 seconds onto someone else’s journey in the interests of safety.  Remember you have as much right to the road as anyone else.

5) Right Turns (or left in most of the rest of the world).  Right turns can be problematic when you are being overtaken by a heavy traffic stream.  The key is signal that you want to make a right turn.  Sadly most motorists will ignore their obligation to let you merge, the key is to make it look like you are going to turn anyway, whilst being aware that most motorists will still happily overtake you.  A bit of a scare will make one of the overtaking cars slow down enough to make a merge and then right turn feasible.  This takes practice.

6) Just because cycling infrastructure is there doesn’t mean you have to use it.  Some cycling infrastructure is truly awful, and by not using it you are sending a message that this needs to be sorted, or at least that we don’t want any more crap infrastructure.

7) Roundabouts.  These can be a problem for cyclists, as can the infrastructure designed to provide an alternative for cyclists due to they sheer impracticality of it.  Many busy roundabouts are being replaced with traffic lights, I would like to hope that cyclists’ needs played a part in this decision to move away from them.  They probably didn’t though.  Most people, regardless of conveyance are bad at using roundabouts.  The skills of not gutter riding and looking behind frequently will help on roundabouts, as will being able to accelerate and ride quite fast.  The alternative is to dismount and cross it as a pedestrian.

These are just some of the tips and techniques I use to make the best out of a bad situation.  If you have any more to share please feel free to comment.

Wednesday, 21 July 2010

Brooks Saddle Update

It has been a few weeks now since I got the Tourist and by extension the Brooks B66 saddle.  I’ve probably done at least 500 km with the saddle by now and I thought I’d share my experiences with it so far.

As I have said before, a harder saddle will be more comfortable in the long run.  When I first got the B66 it had no give whatsoever.  It was comfortable for shorter rides but became uncomfortable after a while due to the cyclical compression of the small amount of flesh between my sit bones and the saddle, which occurred when pedalling.  I realised a few days ago that this had completely gone away, partly due to the saddle having slightly given in the spots where my sit bones are and probably partly down to me getting used to the new saddle.

I got to this stage by riding the bike a little each day, in my normal clothing.  I also did two rides over 60 km but used padded bike boxer shorts to take the edge off.  These rides were at least partially over cobbles and gravel which may have helped to tame the saddle.  I think that I would be ok doing 60 km on the B66 now in my normal clothing.

There were times when I considered giving up on the B66, but I am glad I didn’t.  Now I have put the time in to it, it is my favourite saddle.  Now all I have to worry about is the temptation of getting a Brooks B67 for the Yuba.